IBM Installation Guide

Networking and Split-Site Considerations

Before Installing your Avance servers it is important to understand the networking requirements, additional attention should be made if your are planning to run a split-site configuration.

General Network Requirements

Both of the physical network ports (one on each node) that make up a shared network on an Avance system must be in the same L2 broadcast domain, without any protocol filtering.  Any and all Ethernet packets sent by one Avance node must not be obstructed or rate limited from being received by the other Avance node either by being routed or switched by any L3 network infrastructure.

Avance relies on full IPv4 and IPv6 protocol access, including IPv4 and IPv6 multicast.  Any obstruction of this traffic will prevent a successful install or will compromise the availability of the Avance deployment.  Avance should never generate more than 10 multicasts per node per second on any one network link.

Private Network Requirements

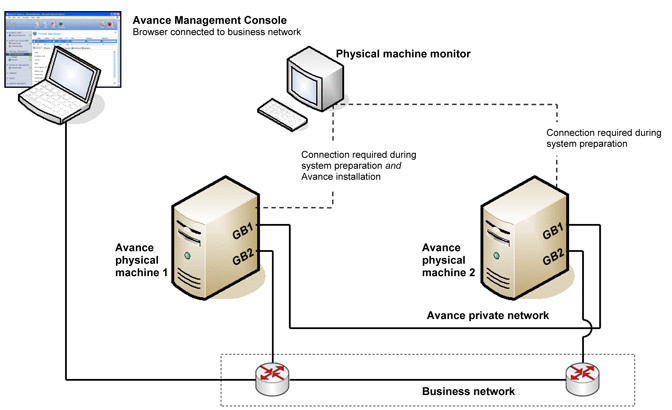
The first onboard Ethernet port on each node must be connected via a private network.  These ports are usually labeled “GbE1”, “NIC1”, etc on the physical server, and the private network that connects the two Avance nodes is called “priv0”.  The private network must have no other network hosts connected.  The simplest private network consists of a single Ethernet cable (crossover or straight through) that connects the first onboard Ethernet port on each server.  If a single Ethernet cable is not used for the private network, see Split-Site Considerations below for additional requirements.

10Gb Sync Network Requirements

Avance may also use 10Gb Ethernet ports as private sync networks.  Network traffic for storage replication between nodes is sent over these networks if they are present.  The requirements are similar to the Private network, as these networks should have no other network hosts connected other than the Avance end points.  If a single Ethernet cable is not used for any of the sync networks, see Split-Site considerations below for additional requirements.

Business Network Requirements

All Ethernet ports, other than 10G Ethernet ports and the Private Network port (first onboard Ethernet port), are treated as Business Networks, which VMs can use to pass traffic.  In order to ensure that Ethernet traffic flows unobstructed to and from VMs from either Avance node:

  • The switch ports connected to Business Networks must not filter ARP packets including gratuitous ARP packets.  Avance will send gratuitous ARP packets on behalf of guest VMs in order to prompt Ethernet switches to update their port forwarding tables to direct VM traffic to the appropriate physical Ethernet port on the appropriate Avance node.
  • The switches connected to Business Networks must not enable any MAC address security features that would disable the movement of a MAC address from one business link to the matching business link on the other node.  Cisco Catalyst switches, for example, support MAC address security features which must be disabled.

If these requirements are not met, or if the switch does not properly update it’s forwarding table when a VM is migrated from one Avance node to the other, the VM may experience a blackout where network traffic is not properly directed to and from the VM.

Split-Site Considerations

If the Private Network or any 10G Sync Networks pass through any networking equipment (i.e. are not connected by just an Ethernet cable), then the requirements outlined in this section must also be met.

Private Network Requirements

  • Switch ports and/or fiber-to-copper converters connected to the Private Network must be set to auto negotiate Ethernet rates and must also support negotiating to both 100Mb/s and 1000Mb/s speeds.  This is a common configuration error made with split-site deployments.
  • Switches and/or fiber-to-copper converters connected to the Private Network must be non-routed and non-blocking with a round-trip latency that does not exceed 10ms.  Calculate latency at 1ms for each 100 miles of fiber, and around 1ms for each non-routed, non-blocking switch or fiber converter.
  • VLANs used to connect the Private network ports must not add any filtering on any of the network equipment between the two VLAN switch ports that are connected to the Avance unit nodes.

No Single Point of Failure

The path taken between Avance nodes in the Private Network must be physically segregated from the path taken by traffic on the Business Networks.  Avance determines liveness of each node by sending heartbeat communication on the Private Network and the first Business Network (example “GbE2”, “NIC2”, etc of each physical server).  If a single physical device or software service fails which causes traffic on both the Private and first Business Network to fail, the Avance nodes may split-brain.  If Avance nodes split-brain, they will each start and run the guest VMs, which will corrupt the VM data (e.g. which copy is correct?) and will have two instances of the same VM communicating on the Business Networks.

Site and System Preparation | IBM

Site and System Preparation

Site Prep 1: Prepare Required Equipment and Information

Connection required during system preparation and Avance installation Two physical machines (PMs)

  • Server model/configuration conforming to Avance Compatibility Matrix, for IBM Servers
  • PMs are similar configurations from identical product family/generation
  • At least two disksfor  each PM.
  • Either an internal DVD drive or USB DVD drive can be used for the installation.

Use keyword “firmware” and release “3.0″ to search the Known Issues database to check for any firmware incompatibilities prior to upgrade or install.

  1. Login to the Avance Customer or Partner Portal.
  2. Click on Search for known issues under technical support.
  3. Select release 3.0 and issue type firmware.

CAT5E, CAT6, or CAT7 network cables for all network ports Monitor and keyboard for system preparation and installation Computer for Avance Management Console

Site Prep 2: Configure Networks

Private Network Connect a network cable between the first embedded network port of each PM, which should be labelled port 1.

See Planning for Split Site Deployment if the PMs are in separate locations. Storage Sync Networks (Optional) Avance supports additional Sync links for increasing data replication performance between PMs. These links must be dedicated 10Gb and connected between PMs in the same manner as the private link. Setting up redundant Sync links is recommended. Business Networks Connect Ethernet cables from the second embedded port in each PM to the business network, which should be labelled port2.

If the network includes a large number of add-on business network (NIC) ports,  defer installation until the basic install is completed. Refer to the section entitled Connecting Business Links  for  more details.

Site Prep 3: Configure Storage

Each physical machine must have at least two physical disks populated in the server’s lowest numbered slots.

  • Configure the RAID controller to boot off the first logical disk.
  • Each RAID array can have only one logical volume assigned to it.
  • RAID 0, 1, 5, 6, and 10 are the only RAID levels supported.
  • Set up RAID configurations identically on both physical machines before installing Avance software.
  • If the 1st logical disk is RAID 1, 5, 6, or 10, Avance will apply an MBR format.
  • If the 1st Logical disk is RAID 0, Avance requires a 2nd logical disk of any RAID type. Avance will apply an MBR format.
  • The RAID controller BIOS configuration utility does not consistently update the size of the logical disk when setting up RAID sets. This must be done manually.

Site Prep 4: Connect Power

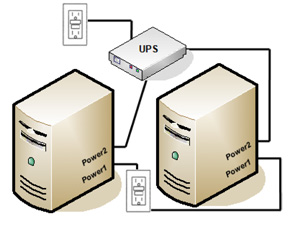
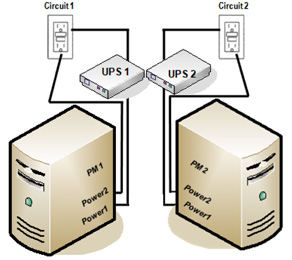
Configure servers with redundant power supplies connected to separate sources. UPS (Optional) Connect one or two uninterrupted power sources (UPS) to the Avance unit: Single UPS Dual UPS Remote Power Control For remote locations, consider a networked UPS or switched Power Distribution Unit (PDU) such as provided by APC. These enable remote power-cycling of PMs through a network.

Site Prep 5: Configure BIOS

Avance automatically configures most required BIOS settings. There are some optional settings which the user may want to consider:

AC Power Recovery Several server vendors allow you to configure whether or not the server will automatically power on and boot after a power cycle. We recommend setting this to ON.
NIC PXE Boot Support Several server vendors allow you to configure whether or not network ports will be used to PXE boot a PM. Avance requires that the first onboard NIC port be enabled for PXE, but not any others. We recommend disabling PXE boot on all NIC ports *except* the first onboard NIC port.

IBM Servers BIOS Initialization

  1. Connect a monitor and keyboard to the first physical machine (PM).
  2. Power on the PM.
  3. Enter BIOS Boot Device Menu, press F1.
  4. Under System Settings > Integrated Management Module, set Commands on USB Interface Preference = Disabled
    1. Wait 30 seconds after making this change before proceeding.
  5. Under System Settings > Integrated Management Module > Network Configuration, set:
    1. Network Interface Port = Shared
    2. Select Save Network Settings, enter Y when prompted to reset the IMM and then Enter.
    3. Press ESC to return to the Integrated Management Module page.
    4. Wait 10 minutes for the IMM reset to complete.
    5. Return to the Network Configuration page and validate that Network Interface Port is set to Shared.
  6. If you have an IBM Emulex 10GNIC installed:
    1. Under System Settings > Emulex NIC Configuration Utility > Emulex One Connect… Port 0
      1. Set vNIC Support = Disabled ii.
      2. Select Save.
    2. Under System Settings > Emulex NIC Configuration Utility > Emulex One Connect… Port 1
      1. Set vNIC Support = Disabled ii.
      2. Select Save.
  7. Save settings and exit
  8. Press the power button on the PM to power it off.

Repeat this process on the second node

Burning an Avance DVD

    • Go to the Stratus Downloads page.
    • Click the needed Avance software ISO image to download it.
    • LinuxDownload the md5sum file
    • When prompted for each download, click Save. Select a save location.
    • Verify the DVD – Windows
      1. Download the Microsoft File Checksum Integrity Verifier (FCIV). The executable and instructions for install can be found on the Microsoft Support Website. Install the tool in the directory with the downloaded ISO file.
      2. Right click on the FCIV file for the image from the Stratus Download page and save it in the directory with the ISO and FCIV executable
      3. Open a command window in Windows and cd to the directory containing the ISO and FCIV executable.
      4. Check the ISO by typing
        fciv.exe -v -xml avance_r4.0.0.8_58272.xml
      5. Pass: Continue burning the DVD
      6. Fail: Repeat the download
  • Verify the DVD – Linux
    1. Download the md5 file associated with the ISO from the Stratus Downloads page. For example avance_r4.0.0.8_58272.md5
    2. Download http://mirror.centos.org/centos/dostools/md5sum.exe to the directory containing the Avance ISO.
    3. Go to the directory containing the md5sum.exe, ISO, and md5.txt files.
    4. Check the ISO by typing
      md5sum.exe --c avance_r4.0.0.8_58272.md
    5. Pass: Continue burning the DVD.
    6. Fail: Repeat the download.

Avance Installation & Configuration | IBM

Avance Installation & Configuration

Note: Installing Avance software erases all hard drives.

  1. Create an Avance DVD. See Burning an Avance DVD.
  2. Connect a monitor and keyboard to the first physical machine (PM).
  3. Power on one PM. (Leave the second PM off.)
  4. Insert the Avance DVD and boot the PM.
  5. Start Install of the product
    1. Enter BIOS Boot Device Menu, press F12 .
    2. In the Boot Device Menu, select Boot from Optical Drive. Press Enter.
    3. Wait for the 1st Avance install screen; you will have 30 seconds to press any key to initiate install process.
    4. Select Install Avance and Press Enter.
  6. After 1-3 minutes you will be prompted to select “Quick Connect” or “Enter IP address information manually”
  7. Avance will prompt you to connect to the Avance Management Portal via the specified IP address.
  8. Follow the on screen directions to complete the configuration and installation process.
  9. After completing the install process you should also consider configuring the following:
    1. Go to Library > Users & Groups to add administrators and remove the default admin account.
    2. Domain authentication, select Preferences > Active Directory
    3. UPS Monitoring,select Preferences > UPS
    4. Unit Owner Information, select Preferences > Owner Information
  10. Select Dashboard, resolve any outstanding alerts. Note: PM node 1 may still be in the process of imaging or syncing. This normally completes within 10-20 minutes after step 9.
  11. On the Physical Machines page, when Node 1 shows running (in Maintenance), select Node 1 and click Finalize.
  12. When both PMs have a next to their name, they are fully in sync, redundant.
  13. Install additional business network cables. See Connecting Additional Business Links.

Congratulations! Avance is fully installed and you can begin creating, importing, and managing virtual machines. Click Virtual Machines in the Avance Management Console, and see the online help for details. See the Avance Management Console online help and the Avance User’s Guide for information on provisioning Virtual Machine resources.

Connecting Business Links

  1. In the Avance Management Console, go to the Networks page.
  2. Connect additional network cables to both nodes, a pair at a time. Ideally in the same NIC slot and port number in each server: For each connection:
    1. Wait for the new Shared Network to appear. If it does not appear within a minute or so, it means your cables are on different subnets or the NIC ports between the nodes are not compatible (e.g 10Gb on Node 0 and 1Gb on Node1).
    2. Double click the shared network name and re-name it based on the based on its L3 Lan connectivity: “10.83.0.x” or “Engineering Lab”.
  3. Verify the newly formed shared network displays a green check.