P2V or V2V for a Ubuntu VM.
Last Modified: 03/27/2014 at 11:17 | Release:Migrating Ubuntu Physical or Virtual Machines from a non-Avance source.
Ubuntu 12.04 VMs running on VmWare, Hyper-V can be converted to run on Avance: this is known as “Virtual-to-Virtual” or “V2V” migration. In addition, it is also possible to convert a Ubuntu 12.04 environment running on a physical server to run on Avance, this is known as “Physical-to-Virtual” or “P2V” machine migration. There are tools from both Acronis, as well as Symantec that can perform this task as well as an open-source tool called G4L, which will be described in more detail.
Setup
Avance requires that the boot volume must exist on the first physical disk. In addition, the conversion process supports a maximum of 3 disks. In order to facilitate the V2V/P2V migration using G4L both the source machine, and targeted Avance server will require access to an FTP server. You will need enough disk space to hold your largest disk that is being migrated, G4l uses Lzop compression so this generally about a 50% compression ration.
- Download g4l from http://g4l.sourceforge.net. Somewhere on this page you will see a “browse all files”, you will want to download both the ISO, g4l-v0.43.iso, as well as the g4l scripts that are contained in the tar file called g4l-v0.43.devel.tar.gz.. Please use only the versions specified in this document, these versions can found on http://http://sourceforge.net/projects/g4l/files/
- Download the G4L scripts to a G4L subdirectory in the root directory of the source computer.
- Expand (untar) the file by typing the following command:
tar –zxvf g4l-v0.43.devel.tar.gz
- Start G4L by typing the following (assuming it was untared at /root): /root/g4l/bootcd/rootfs/g4l
- Select Yes and press Enter.
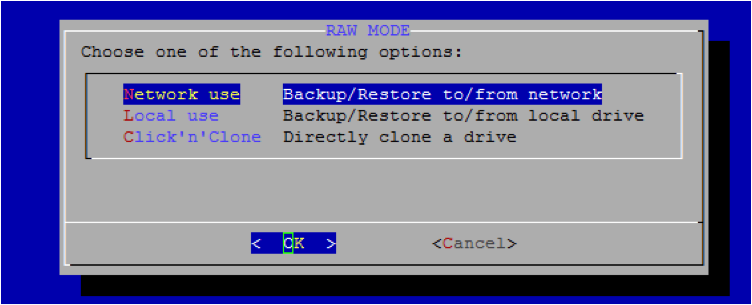
- Select RAW Mode and press Enter.

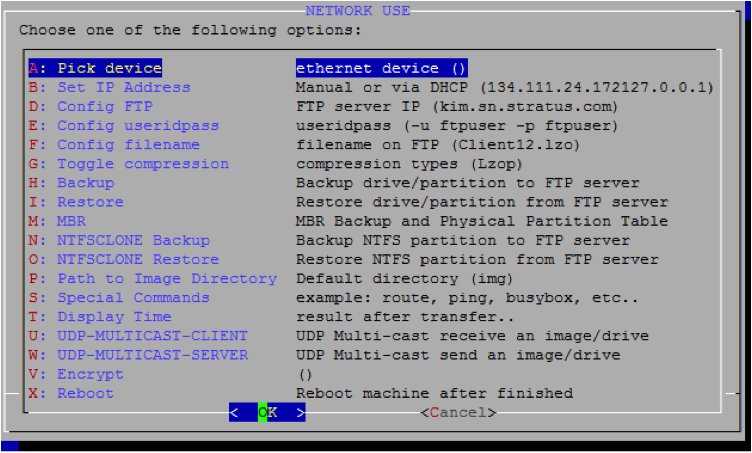
- Select Network use and press Enter.

- Configure the IP address of the FTP server, the userid and password, and the filename (items D, E, and F, below).

- Specify a path for Path to Image directory (item P). This directory is for writing and reading backup files. If the directory does not exist, create or request a directory on the FTP server with the appropriate permissions.
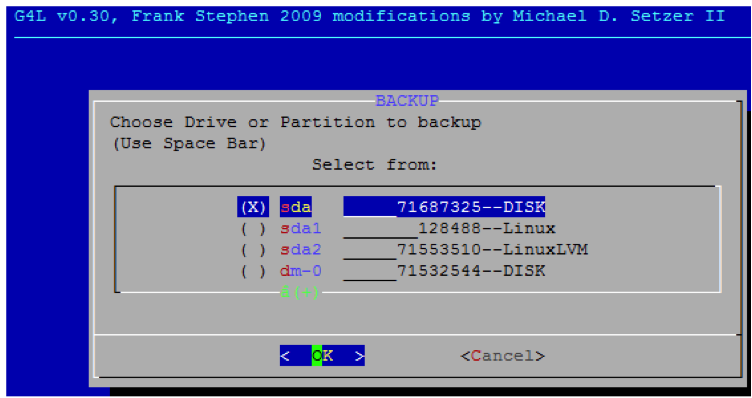
- Select Backup and press Enter.
- Select the backup drive from the s, hd, and c0d0X disks. It is important to backup the entire disk, with selecting any of its partions. In the example below this is the “sdA” drive which is a total of ~70GB.

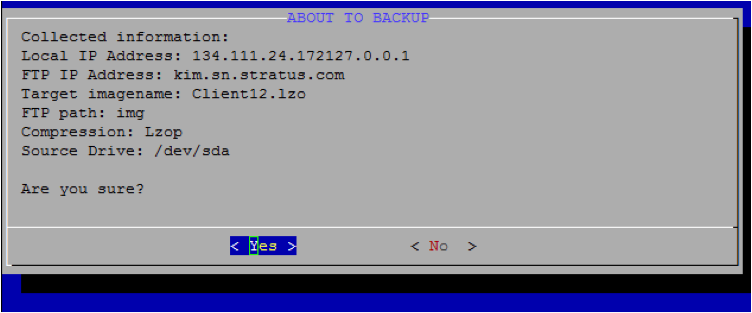
- Check the displayed information. If correct, press Enter.

The status is displayed while G4L backs up the drive. This may take some time as the copy is generally performed somewhere between 50-70 Mbytes/sec depending on your hardware configuration. - Perform steps 7 through 9 for each additional disk. Give each disk a unique file name. If disk space is a premium on your ftp server, you can do one disk at a time, after it has been restored on you Avance server then you can delete it and proceed to the next disk.
Create a Ubuntu Virtual Machine Container on your Avance Targer
On the target Avance server, you need to create a Ubuntu VM as a container. The key is to insure that the VM container is configured with the same number and size of disks, and number of network adapters. The number of VCPUs and Memory can be increased or descreased as desired. Failure to allocate the appropriated disk containers will result in a failed conversion because of lack of disk space.
- Create a Virtual CD from the G4l Iso that was downloaded from sourceforge.
- Follow the instructions for creating a Ubuntu VM, without following the step to convert it from an HVM to PV guest. That is the final step after completing the P2V. Note that this step can be aborted as soon as the VM goes from “installing” to “running” on the Virtual Machine page.
- When the VM transitions to “running” it can be safely powered down via the “poweroff” button the virtual machine page. When it successfully transitions to stop, there will be a “Boot from CD” option.
- Now, click “Boot from CD”. You will be presented with a pulldown, select the G4l iso that you created in Step 1.
- Press Enter till the console prompt opens. Type .g4l.
- Select RAW Mode and press Enter.
- Select Network use and press Enter.
- Configure the IP address of the FTP server, the userid and password, and the filename.
- Select the backup file created previously, and click OK.
- Select the destination drive.
- Verify the displayed information, then press Enter.
- Repeat steps 8, 9, and 10 for each additional drive to restore.
- After restoring all the drives, reboot the virtual machine: select X: Reboot in the G4L window, and press Enter.
At this point you should boot into the Ubuntu VM. You are almost done, but, there a couple more steps.
- If the data disks are mounted in “/etc/fstab” you will have to adjust these mount points. Note that drives that were presented as either “hdX”, “sdX” or “cd0P0″ are now presented as “xvdX”.
- P2V only:Disable any services that interact directly with hardware, such as:
- Dell OpenManage (OMSA)
- HP Insight Manager
- V2V only:Disable the following services:
- VmWare tools
- Hyper-V tools
At this point, depending on your deployment scenario it may be necessary to change the host name by editing the /etc/sysconfig/network file and ensuring that any static IP addresses assigned are unique. At this point only the post-installation steps to configure the Ubuntu VM for PV conversion remain.

