Site and System Preparation | Intel
Last Modified: 12/20/2013 at 15:34 | Release:Table of Contents
Site Prep 1: Prepare Required Equipment and Information
Site Prep 2: Configure Networks
Site and System Preparation
Site Prep 1: Prepare Required Equipment and Information
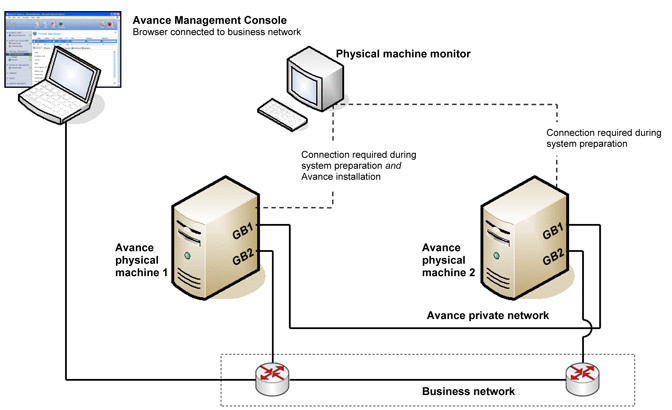
Connection required during system preparation and Avance installation  Two physical machines (PMs)
- Server model/configuration conforming to Avance Compatibility Matrix, for Intel Based Servers.
- PMs are similar configurations from identical product family/generation
- At least two disks on each PM.
- Either an internal DVD drive or USB DVD drive can be used for the installation.
Use keyword “firmware” and release “3.0″ to search the Known Issues database to check for any firmware incompatibilities prior to upgrade or install.
- Login to the Avance Customer or Partner Portal.
- Click on Search for known issues under technical support.
- Select release 3.0 and issue type firmware.
CAT5E, CAT6, or CAT7 network cables for all network ports Monitor and keyboard for system preparation and installation Computer for Avance Management Console
- Locate near Avance unit during installation
- Browser conforming to the Avance Compatibility Matrix, which is basically Chrome, Firefox, or IE9.
- Current version of Java™ Runtime Environment (JRE™)
Site Prep 2: Configure Networks
Private Network Connect a network cable between the first embedded network port of each PM, labelled as Port 1.
See Planning for Split Site Deployment if the PMs are in separate locations. Storage Sync Networks (Optional) Avance supports additional Sync links for increasing data replication performance between PMs. These links must be dedicated 10Gb and connected between PMs in the same manner as the private link. Setting up redundant Sync links is recommended. Business Networks Connect Ethernet cables from the second embedded port in each PM to the business network, labelled as Port 2.
If the network includes a large number of add-on business network (NIC) ports, defer installation until the basic install is completed. Refer to the section entitled Connecting Business Links for more details.
Site Prep 3: Configure Storage
Each physical machine must have at least two physical disks populated in the server’s lowest numbered slots.
- Configure the RAID controller to boot off the first logical disk.
- Each RAID array can have only one logical volume assigned to it.
- RAID 0, 1, 5, 6, and 10 are the only RAID levels supported.
- Set up RAID configurations identically on both physical machines before installing Avance software.
- If the 1st logical disk is RAID 1, 5, 6, or 10, Avance will apply an MBR format.
- If the 1st Logical disk is RAID 0, Avance requires a 2nd logical disk of any RAID type. Avance will apply an MBR format.
- The LSI MegaRAID controller BIOS configuration utility does not consistently update the size of the logical disk when setting up RAID sets. This must be done manually.
Site Prep 4: Connect Power
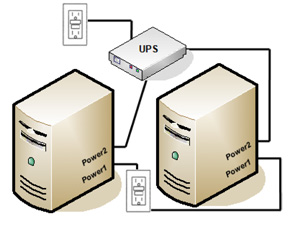
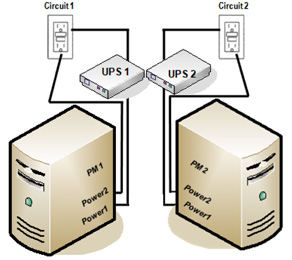
Configure servers with redundant power supplies connected to separate sources. UPS (Optional) Connect one or two uninterrupted power sources (UPS) to the Avance unit: Single UPS  Dual UPS
  Remote Power Control For remote locations, consider a networked UPS or switched Power Distribution Unit (PDU) such as provided by APC. These enable remote power-cycling of PMs through a network.
Site Prep 5: Configure BIOS
Avance automatically configures most required BIOS settings. There are some optional settings which the user may want to consider:
| AC Power Recovery | Several server vendors allow you to configure whether or not the server will automatically power on and boot after a power cycle. We recommend setting this to ON. |
|---|---|
| NIC PXE Boot Support | Several server vendors allow you to configure whether or not network ports will be used to PXE boot a PM. Avance requires that the first onboard NIC port be enabled for PXE, but not any others. We recommend disabling PXE boot on all NIC ports *except* the first onboard NIC port. |
Intel S2400 and S2600 GZ/CP/GP Server BIOS Initialization
- Connect a monitor and keyboard to the first physical machine (PM).
- Power on the PM.
- Enter BIOS setup by pressing F2 key when prompted
- Load defaults by hitting F9 at main screen
- Press Y to confirm load defaults
- Use the arrow keys to select the Advanced page
- Select Processor Configuration and use enter key
- Select Intel(R) Virtualization Technology (default is Disabled)
- Use plus and minus keys to set to Enabled
- Use Esc key and select Mass Storage Controller Configuration and use enter key
- Select SAS/SATA Capable Controller (default is INTEL(R) RSTe)
- Use plus and minus keys to set to Disabled
- Select Processor Configuration and use enter key
- Use the Esc key and use the arrow keys to select Boot Options
- Select Boot Option #1 and use the enter and arrow keys to set to the network adapter, and use the enter key
- Select Boot Option #2 and use the enter and arrow keys to set to the RAID controller[1]and use the enter key
- Save configuration and reset (to exit BIOS setup), use the F10 key followed by Y
Intel S1200KP Server BIOS Initialization
- Connect a monitor and keyboard to the first physical machine (PM).
- Power on the PM.
- Enter BIOS setup by pressing F2 key when prompted
- Load defaults by hitting F9 at main screen
- Press Y to confirm load defaults
- Use the arrow keys to select the Bootpage
- Select Boot Device Priority
- Use the plus and minus keys to set the boot order to[1]
- Network
- Hard Disk Drives
- Save and Exit BIOS (F10 followed by Y)
[1]Note: Do not change Boot Menu Type from Normal to Advanced as this will reset the Boot order.

