Ubuntu 12.04 VM Support
Last Modified: 12/11/2013 at 13:57 | Release:
Avance version 3.1.1.x adds support for Ubuntu 12.04 Virtual Machines. Prior to this release, Avance ran all CentOS/Rhel 4.x and 5.x releases as paravirtualized (Xen-PV) VMs, and CentOS/Rhel 6.x VMs in full hardware virtualization mode (HVM). Ubuntu is the first VM supported by Avance that requires installation in HVM mode and then a conversion to Xen-PV mode. The remainder of this document describes special considerations for Ubuntu VMs, and the procedure for converting them to Xen-PV mode.
Special Considerations for Ubuntu VMs
There are special considerations for Ubuntu VMs that are necessary to ensure it can be properly converted from HVM mode to Xen-PV mode. To install a Ubuntu 12.04 VM, you need to create a VCD from either the 64-bit or 32-bit ISO provided by the Vendor. On the second page of the creation wizard, be sure and select “All other Linux Distributions”. After completing each step of the creation wizard, the VM is created and you will be presented the standard Ubuntu installation screen in a newly opened console window. There are three special considerations:
- The boot, grub, and initrd files must be installed on the first partition of the first logical disk. This is the default location during a Ubuntu install. Ignoring this step will result in the VM failing to boot after converting it to Xen-PV mode and will require that the VM be destroyed and re-created.
- The VM must be setup to accept its clock source in UTC format, which is the default option for a Ubuntu install. This can be corrected after the initial install by ensuring that ”UTC=yes” is set in the VMs /etc/default/rcS configuration file.
- The last step is required to ensure you continue to get console access from the Avance management portal after converting your VM to Xen-PV mode. After completing the installation in HVM mode, log into the newly created VM before you convert it to Xen-PV mode, and copy and paste the file below into /etc/init/hvc0.conf.
—– cut here —
# hvc0 - getty
#
# This service maintains a getty on hvc0 from the point the system is
# started until it is shut down again.

start on stopped rc RUNLEVEL=[2345] and (
            not-container or
            container CONTAINER=lxc or
            container CONTAINER=lxc-libvirt)
stop on runlevel [!2345]
respawn
exec /sbin/getty -8 38400 hvc0
—– cut here —-
Converting to Ubuntu VMs Xen-PV Mode
After completing the initial installation, and taking care to follow the special considerations for Ubuntu VMs you are ready to convert your VM to Xen-PV mode. Failing to perform this step will prevent the VM from reliably migrating between nodes under all conditions and can result in corrupted data when recovering from unexpected failures. To make the conversion, you must select the VM on the Virtual Machines page of the management portal and click the SHUTDOWN button. Once the VM is stopped you need to click the Config button to launch the Reprovisioning Wizard. In the wizard, you need to click NEXT to skip forward until you get to the 4th page of the installation wizard. At this point you will see an option at the bottom of the page to select PV. When you select this option, you will receive a prompt to ensure you followed the special instructions on this page before proceeding.
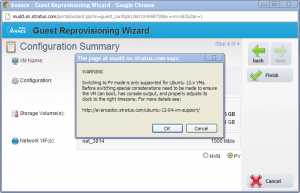
After reading and acknowledging the warning, hit OK and then accept all of the changes by clicking the Finish button in the top right hand corner of the wizard. At this point, the VM is converted to Xen-PV mode which takes effect on the next boot.
