DOM0 Access
Last Modified: 05/30/2014 at 13:46 | Release:Avance R4.0.0.7 release adds support for accessing DOM0. A new user called dom0user has been added with a default password of dom0user to provide this access. The dom0user has root privileges when using the sudo command. Note that not all commands require root privileges. For those that do sudo can be used.
It is strongly recommended that the dom0user password be changed immediately after upgrade as described below. Access to DOM0 using dom0user is for diagnostic purposes only. Modifications to the base Avance product without the approval of Stratus Technologies are not supported.
- Attach a keyboard and monitor to either of the physical nodes
- Login in to the physical console with the username/password combination dom0user/dom0user.
- Change the dom0user password when prompted
- Access to the system is limited to a keyboard and monitor attached to the physcial system after upgrade. If network based access is desired then enable remote access prompted.
The pasword change and remote access enable are applied to both nodes so it is only necessary to do this from a single node. The password will be set to the same value on both nodes.
Once these settings have been changed the user will no longer be prompted to change them at dom0user login. Future upgrades, node replace, and recover operations will also maintain these settings.
Changing the password after initial login
Enter the following command to change the password again at any time:
- Login in to the console of either node
- Enter this command: rm /usr/lib/dom0user/.passwdChanged
- Logout
- Login as dom0user again. This will once again prompt the user to change the password and once done will be applied to both nodes.
Changing remote acces after initial login
To change the remote access
- Login in to the console of either node
- Enter this command: rm /usr/lib/dom0user/.accessChanged
- Logout
- Login as dom0user again. This will once again prompt the user to enable or disable remote access setting and once done will be applied to both nodes.
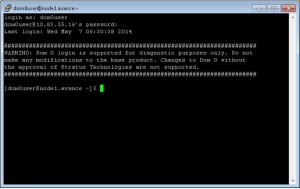
A sample login session from the console:
Authorized users only Avance Unit Summary: IP: 10.83.55.16 Gateway: 10.83.0.1 DNS Servers: 134.111.24.254 Local PM Summary: node is primary IPV6 link-local: fe80::226:b9ff:fe55:5fd4/64 Stratus Avance Server R4.0.0.7 (svn:58199M) node1 login: dom0user Password: dom0user ############################################################# WARNING: Dom 0 login is supported for diagnostic purposes only. Do not make any modifications to the base product. Changes to Dom 0 without the approval of Stratus Technologies are not supported. ############################################################# The dom0user password has not been changed. Would you like to change it now? (y/n): y Changing password for user dom0user. Changing password for dom0user. (current) UNIX password: New password: Retype new password: passwd: all authentication tokens updated successfully. The dom0user password has been changed on this node. The dom0user password has been changed on the peer node. Remote access for dom0user is currently disabled. Would you like to enable it (y/n)? y Remote access for dom0user will be enabled. Successfully enabled dom0user remote access on this node. Successfully enabled dom0user remote access on the peer node. [dom0user@node1.avance ~]$On future logins only the WARNING banner will be displayed. When performing a node replacement or recovery the password and remote access settings will be applied to the replaced/recovered node. Password and remote access settings are also retained on upgrade.
Remote Node Access
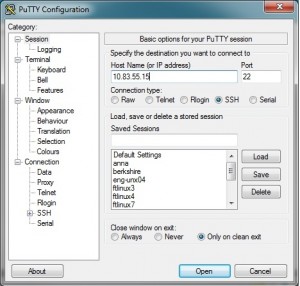
Once remote access has been enabled the primary node can be accessed using putty or plink or whatever access tool the user would like. SSH should be used. Putty and plink can be downloaded from the http://www.putty.org site.
A few examples below:
EXAMPLE 1
A putty ssh session can be established using the IP address of the Avance Unit (can be found in the UI header):
EXAMPLE 2
Using plink installed on a Windows desktop a command can be run on the primary node. In this example the hostname command is run and returns the name of the primary node:
C:\>plink -ssh -l dom0user -pw dom0userpassword 10.83.55.16 “hostname” node1Note that the use of sudo was not required in this example.
EXAMPLE 3
C:\>plink -t -ssh -l dom0user -pw dom0userpassword 10.83.55.16 “sudo tail /var/log/messages”
May 8 12:01:01 localhost kernel: imklog 4.6.2, log source = /proc/kmsg started. May 8 12:01:01 localhost rsyslogd: [origin software="rsyslogd" swVersion="4.6.2 " x-pid="5132" x-info="http://www.rsyslog.com"] (re)start May 8 12:01:02 localhost PcapScrub: Scrubbed 0 files, removing 0 bytes of the 0 bytes currently in /var/log/pcap May 8 12:10:01 localhost init: Connection from private client May 8 12:20:01 localhost init: Connection from private clientNote that the use of sudo was required in this example. The –t option is required in order to execute sudo.
EXAMPLE 4
This example shows the use of the ipmitool from a putty session to get BMC information. In this case we are listing sensor types:
[dom0user@node1.avance ~]$ ipmitool -v sdr type list
Sensor Types: Temperature Voltage Current Fan Physical Security Platform Security Processor Power Supply Power Unit Cooling Device Other Memory Drive Slot / Bay POST Memory Resize System Firmwares Event Logging Disabled Watchdog System Event Critical Interrupt Button Module / Board Microcontroller Add-in Card Chassis Chip Set Other FRU Cable / Interconnect Terminator System Boot Initiated Boot Error OS Boot OS Critical Stop Slot / Connector System ACPI Power State Watchdog Platform Alert Entity Presence Monitor ASIC LAN Management Subsystem Health Battery Session Audit Version Change FRU StateEXAMPLE 5
To execute a command on the peer node from a putty session:
[dom0user@node1.avance ~]$ sudo ssh peer “ls /var/log/messages” /var/log/messagesTo execute the same command on the peer node using the plink command:
C:\>plink -t -ssh -l dom0user -pw dom0userpassword 10.83.55.16 “sudo ssh peer ls /var/log/messages” /var/log/messages


